Swift Distributed Actors
tl;dr: The distributed actor system is a cool way to connect different environments/nodes/systems without "leaving" the Swift language. I created a proof of concept with the basic concepts and documented my learnings in this blog post and this repo.
Introduction
The Swift programming language includes the Actor language feature, which is a reference type that protects its mutable state by ensuring that its properties and methods are accessed only from a single thread at a time. This prevents data races in concurrent code.
The distributed actor language feature is based on this and has location transparency as its goal. The focus here is on the resources (the implementation of a distributed actor) instead of the location/implementation where it is located in a distributed system. In this blog post, I don’t want to simply copy the documentation, but instead provide a hands-on example.
Let’s assume we have a macOS Catalyst app and a Vapor server that need to communicate with each other. In the context of this blog post, we assume that both components are running permanently and should be statically connected to each other and therefore the use of distributed actors can be useful. Each component should send information (e.g. events and commands) to the other. We will break down the following sequence of events and clarify each step:
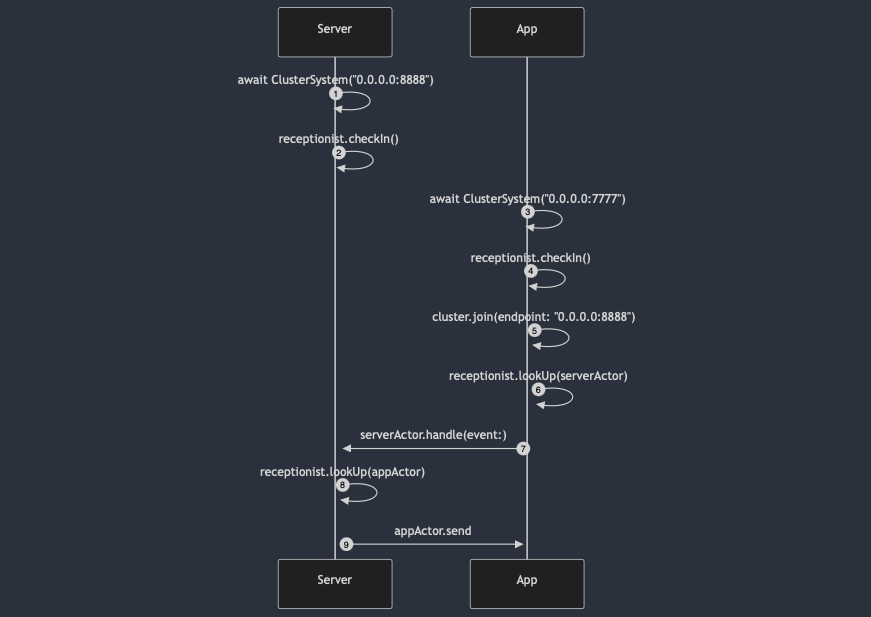
On each side, we will create a ClusterSystem that provides an endpoint the other node can connect to.
Learning: Before we continue, we should add some (debug) logging for events to observe what happens in the cluster:
Task {
    for await event in system.cluster.events {
        print("******** event \(event)")
    }
}
Connection
There are two ways to form a cluster and establish a connection between different components.
Join manually
You can manually join the cluster by calling the actorSystem.cluster.join(host: "0.0.0.0", port: 8888) method). This method does not wait for the connection to be established. Alternatively, you can use one of the joined(...) methods).
Discovery
I personally prefer the discovery approach. You can initialize the ClusterSystem and provide ServiceDiscoverySettings with a ServiceDiscovery implementation. This allows the system to automatically discover other nodes in the network.
The ServiceDiscoverySettings(static:) provides a simple way to define a list of static nodes if you know them upfront.
var settings = ClusterSystemSettings(name: "HomeAutomation-App", host: "0.0.0.0", port: 7777)
settings.discovery = ServiceDiscoverySettings(static: [.init(host: "0.0.0.0", port: 7777), .init(host: "0.0.0.0", port: 8888)])
actorSystem = await ClusterSystem("HomeAutomation-App", settings: settings)
Advertise & Resolve Actors
Now that we have a connection between the two nodes, we can advertise and resolve actors. The Receptionist is a distributed actor that provides a way to advertise and resolve actors by their key (see documentation for more info).
Here’s an example of how to define an actor:
typealias DefaultDistributedActorSystem = ClusterSystem

public extension DistributedReception.Key {
    static var homeCommandHandler: DistributedReception.Key<HomeCommandHandler> {
        "homeCommandHandler"
    }
}

public distributed actor HomeCommandHandler {
    public distributed func handle(command: String) {
        print("******** Handling command: \(command)")
    }
}
Afterwards, you can advertise and resolve the actor:
// Advertise HomeCommandHandler on actor 1
let actor = HomeCommandHandler(actorSystem: actorSystem)
await actorSystem.receptionist.checkIn(actor, with: .homeCommandHandler)

// Resolve HomeCommandHandler on actor 2
let actor = await actorSystem.receptionist.lookup(.homeCommandHandler)
Learning: You must always hold a reference to the actor to keep it alive - otherwise, you will get a DeadLetter error.
Summary
In this blog post, we have learned how to create a distributed actor system with Swift. We walked through the basic concepts and the sequence of events required to establish a connection between two nodes. In this example repo, you can find the full implementation of the sequence diagram above.
Thank you for reading! I’m looking forward to your feedback.
Useful Links
- The different repositories of Jaleel on GitHub
- GitHub Repo with Spike from Rachel
- Basic Concepts: DistributedCluster Documentation